テキストレイアウトでヒットテストを実行する方法
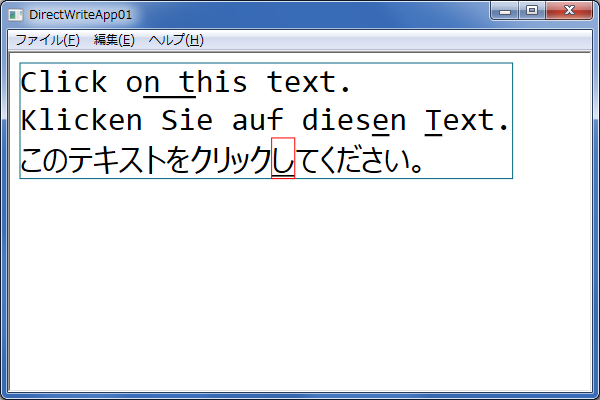
今回は、How to Perform Hit Testing on a Text Layout - Windows applications | Microsoft Docsです。そして、参考にしたサンプルの内容に文字列全体の領域の取得とヒットテストでヒットした文字の領域も描画するコードを追加しました。

まず、Direct2D に挑戦を参考にサンプルを作成する前の準備を行ってください。準備ができたら、CChildViewにサンプルコードを実装していきます。
1.デバイス非依存のオブジェクトを作成
void CChildView::DoCreateDeviceIndependentResources()
{
    //Direct2Dのファクトリオブジェクト
    m_d2dFactory = dx::Direct2D::CreateFactory();

    //DirectWriteのファクトリオブジェクト
    m_dwFactory = dx::DirectWrite::CreateFactory();

    //テキストレイアウトに使用するテキスト形式オブジェクト
    m_TextFormat = m_dwFactory.CreateTextFormat(L"consolas", 32.0F);
    m_TextFormat.SetTextAlignment(dx::DirectWrite::TextAlignment::Leading);
    m_TextFormat.SetParagraphAlignment(dx::DirectWrite::ParagraphAlignment::Near);

    //テキストレイアウトオブジェクト
    CString msg = L"Click on this text.\nKlicken Sie auf diesen Text.\nこのテキストをクリックしてください。";
    m_TextLayout = m_dwFactory.CreateTextLayout(msg, msg.GetLength(), m_TextFormat, FLT_MAX, FLT_MAX);

    //テキストを描画する位置
    m_orgText.X = 10.0F;
    m_orgText.Y = 10.0F;

    //テキストの描画サイズ
    dx::DirectWrite::TextMetrics text_metrics;
    m_TextLayout->GetMetrics(text_metrics.Get());

    //テキストを描画する領域を計算します。
    m_rcText.Left = text_metrics.Left + m_orgText.X;
    m_rcText.Right = m_rcText.Left + text_metrics.Width;
    m_rcText.Top = text_metrics.Top + m_orgText.Y;
    m_rcText.Bottom = m_rcText.Top + text_metrics.Height;
}
文字列全体の描画サイズは、IDWriteTextLayout::GetMetricsを使って、実際に描画する前に取得できます。GetMetricsは、文字列中の改行も認識して期待するサイズを返してくれます。これらを確認するためにデバイス非依存のオブジェクトの作成時に1度だけ取得し、このサイズの四角を描画しています。
このIDWriteTextLayout::GetMetrics関数は、dxライブラリで定義されていなかったので直接元のオブジェクトにアクセスして呼び出しています。こういった使い方ができるのもdxライブラリのいいところです。
2.デバイス依存のオブジェクトを作成
void CChildView::DoCreateDeviceResources()
{
    // レンダーターゲットの作成
    m_rt = m_d2dFactory.CreateHwndRenderTarget(*this);

    //ブラシの作成
    m_Brush = m_rt.CreateSolidColorBrush(dx::Color());
}
3.デバイス依存のオブジェクトを後始末
void CChildView::DoDiscardDeviceResources()
{
    m_Brush.Reset();
}
4. 描画する処理
    //背景クリア
    m_rt.Clear(dx::Color(1.0F, 1.0F, 1.0F));

    //文字列を描画します。
    m_Brush.SetColor(dx::Color(0.0F, 0.0F, 0.0F));
    m_rt.DrawTextLayout(m_orgText, m_TextLayout, m_Brush);

    //文字列の領域を描画します。
    m_Brush.SetColor(dx::Color(0.0F, 0.4F, 0.5F));
    m_rt.DrawRectangle(m_rcText, m_Brush);

    //ヒットテストでヒットした文字の領域を描画します。
    m_Brush.SetColor(dx::Color(1.0F, 0.0F, 0.0F));
    m_rt.DrawRectangle(m_rcHitText, m_Brush);
SolidColorBrush の色の変更は十分に無視できるほど短い処理時間なので描画毎に色を設定しても問題ありません。ヒットテストでヒットした文字の領域は赤で囲っています。この領域はマウスの左クリックしたときに取得しています。
5.クリックしたときの処理
void CChildView::OnLButtonDown(UINT nFlags, CPoint point)
{
    DWRITE_HIT_TEST_METRICS hitTestMetrics;
    BOOL isTrailingHit;
    BOOL isInside;

    m_TextLayout->HitTestPoint(
                    (FLOAT)point.x - m_orgText.X,
                    (FLOAT)point.y - m_orgText.Y,
                    &isTrailingHit,
                    &isInside,
                    &hitTestMetrics
                    );

    m_rcHitText.Left = hitTestMetrics.left + m_orgText.X;
    m_rcHitText.Right = m_rcHitText.Left + hitTestMetrics.width;
    m_rcHitText.Top = hitTestMetrics.top + m_orgText.Y;
    m_rcHitText.Bottom = m_rcHitText.Top + hitTestMetrics.height;

    if(isInside)
    {
        BOOL underline = m_TextLayout.GetUnderline(hitTestMetrics.textPosition);

        DWRITE_TEXT_RANGE textRange = {hitTestMetrics.textPosition, 1};

        m_TextLayout.SetUnderline(!underline, textRange);
    }

    //再描画
    Invalidate(FALSE);

    D2dWnd::OnLButtonDown(nFlags, point);
}
ここまでの実装が済むとCChildViewクラスは下記のようになっています。
class CChildView : public dx::D2dWnd
{
protected:
    virtual BOOL PreCreateWindow(CREATESTRUCT& cs);

    virtual void DoCreateDeviceIndependentResources();
    virtual void DoCreateDeviceResources();
    virtual void DoDiscardDeviceResources();
    virtual void DoDraw();

private:
    dx::Direct2D::Factory1 m_d2dFactory;
    dx::DirectWrite::Factory1 m_dwFactory;
    dx::DirectWrite::TextFormat m_TextFormat;
    dx::DirectWrite::TextLayout m_TextLayout;

    dx::Direct2D::SolidColorBrush m_Brush;

    dx::Point2F m_orgText;
    dx::RectF m_rcText;
    dx::RectF m_rcHitText;

    DECLARE_MESSAGE_MAP()

public:
    afx_msg void OnLButtonDown(UINT nFlags, CPoint point);
};
それでは、ビルドして実行して下さい。サンプルと同じ画面がでれば成功です。サンプルコードはここに置いてあります。